
SelfSense Event Server
The Event Server is the piece of SelfSense that lives on a laptop, not on a wrist. It exists for the situations where a single phone-and-watch setup isn't enough: a room with multiple performers, a workshop with a dozen participants, a performance where movement from one body needs to drive sound or feedback for another. The server is what holds the shared session together.
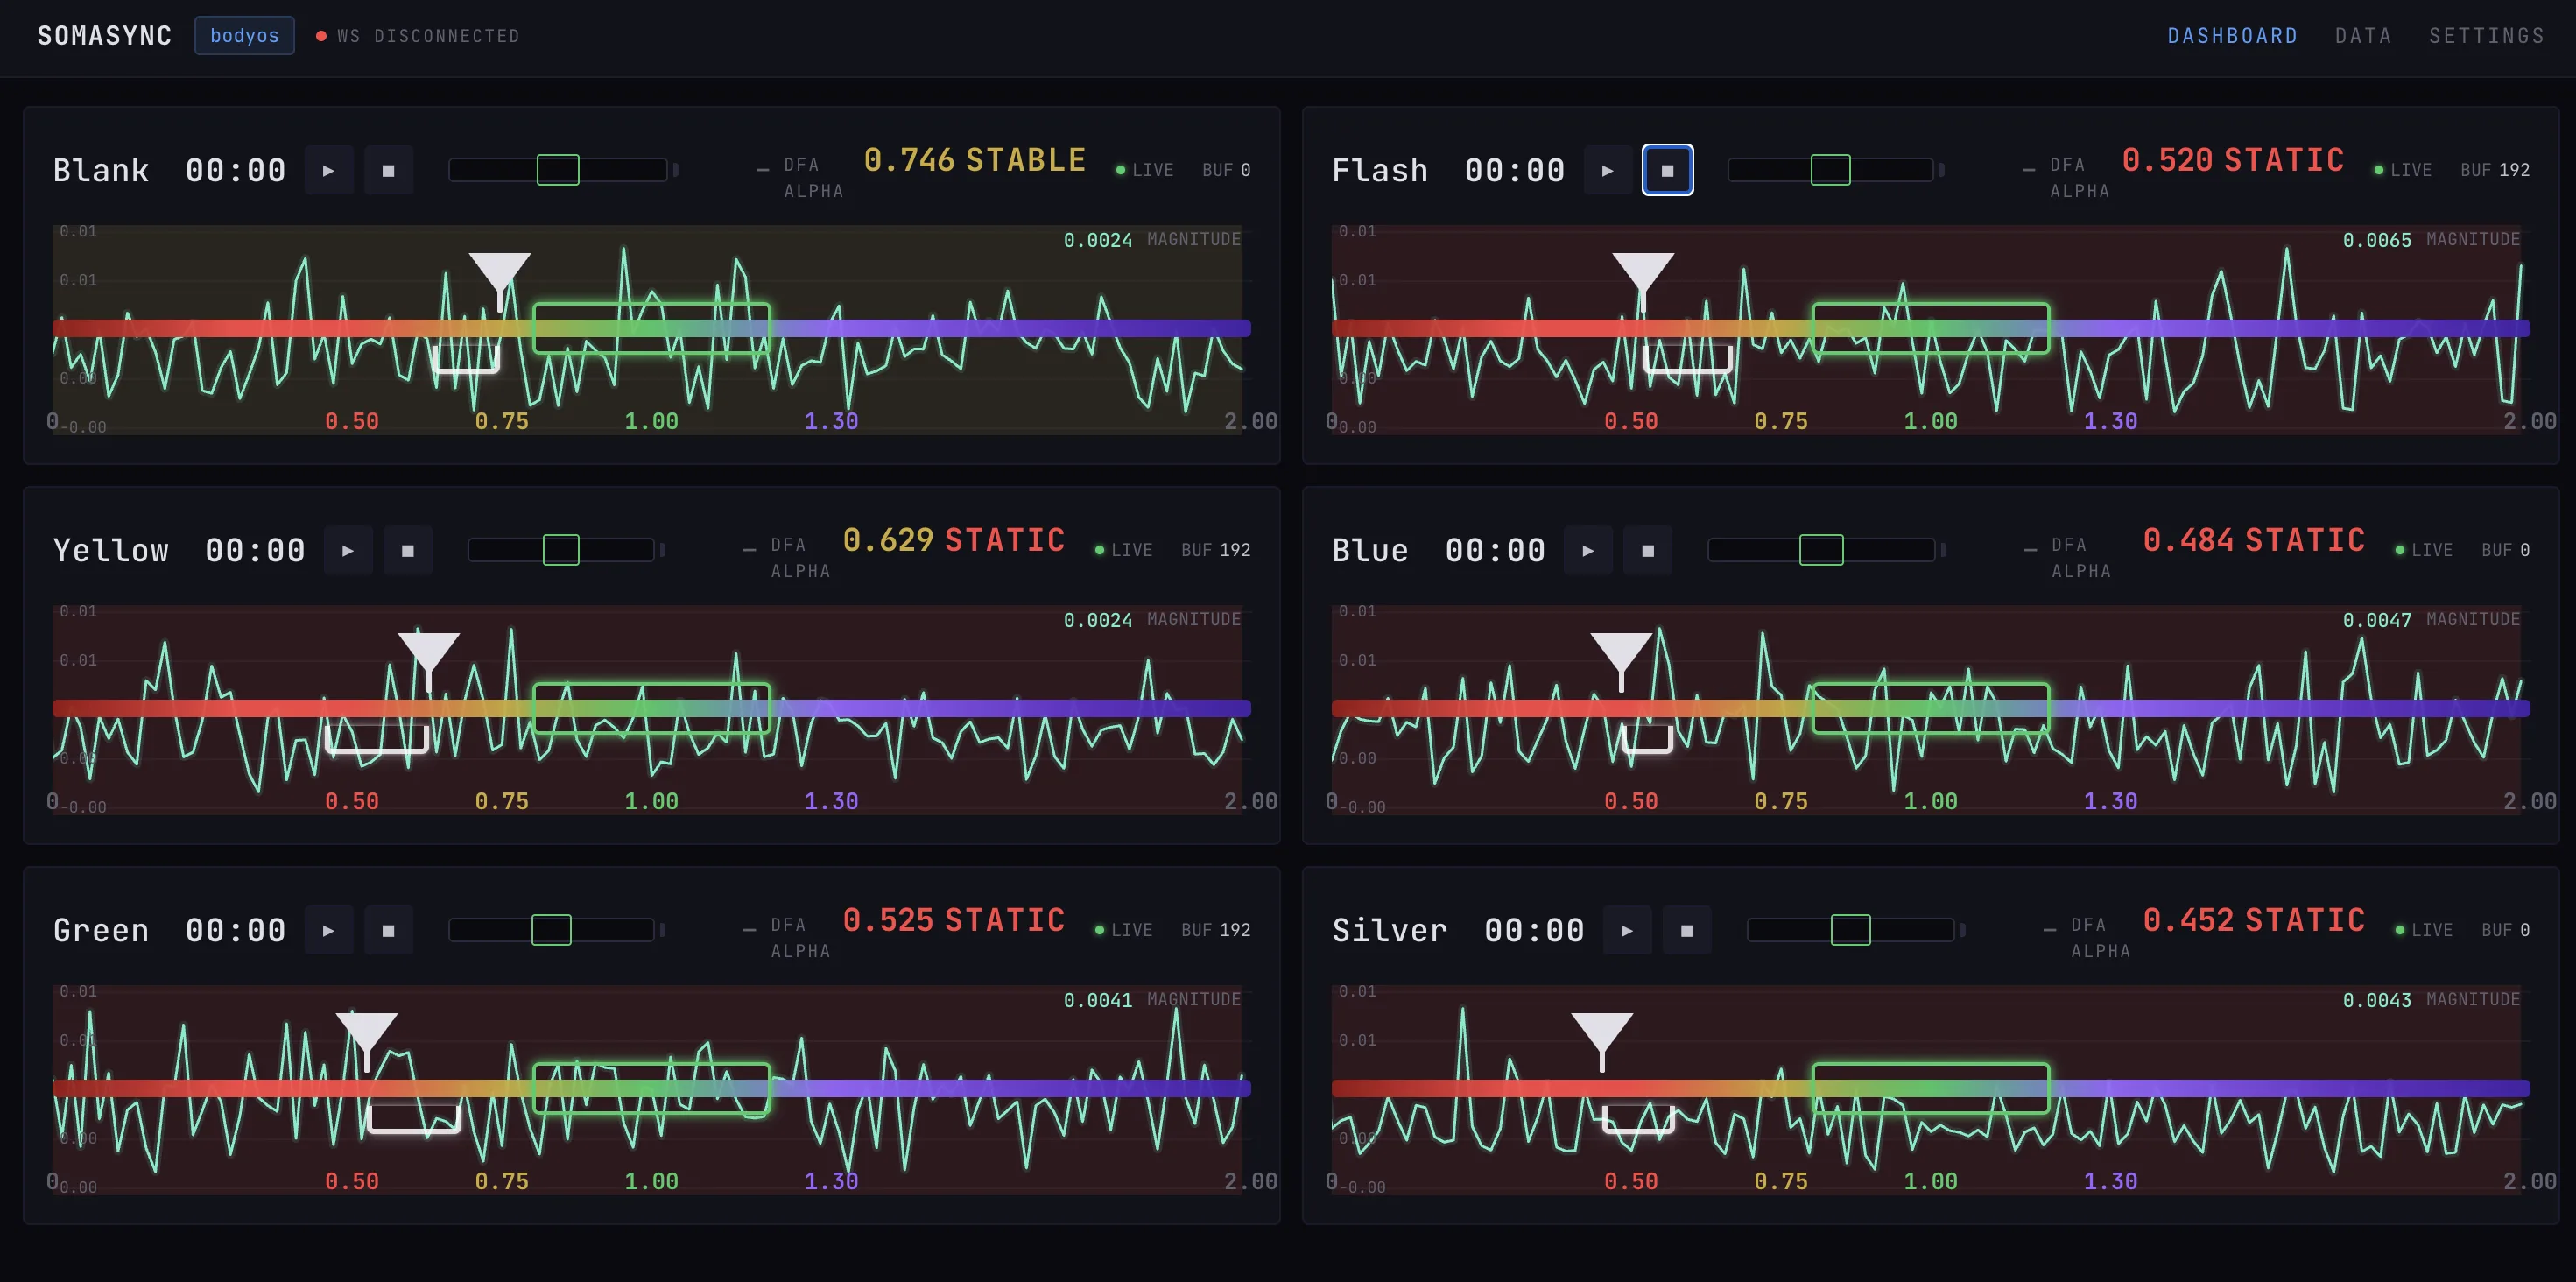
It is a Node.js + Express application with two HTTP servers, a UDP OSC receiver, and two WebSocket servers — each with a different role.
Hosted vs. Self-Hosted — What Works Where
The server can run two ways, and the transport you can use depends on which.
- Hosted instance at server.selfsense.me — accepts WebSocket ingest only. It is reachable from anywhere over the public internet, but UDP/OSC and direct Bluetooth connections cannot cross the open internet, so they aren't available here.
- Self-hosted on your own laptop or LAN server — supports all three transports: WebSocket, OSC over UDP, and Movesense over Bluetooth. Required if you need OSC routing to music software, or if you want the server to connect directly to Movesense sensors over BLE.
In short: OSC/UDP and Movesense Bluetooth only work when the server runs locally. Anything from the hosted instance must come in over a WebSocket.
Architecture in One Glance
| Component | Port | Purpose | Hosted | Self-hosted |
|---|---|---|---|---|
| Web UI + viewer WebSocket | 3005 | Dashboards, settings, live data push to browsers | ✓ | ✓ |
| Ingest API + ingest WebSocket | 8765 | Sensor apps (iOS, custom clients) stream data in | ✓ | ✓ |
| OSC receiver | UDP 9000 | Receives motion data from apps and devices that speak OSC | — | ✓ |
| Movesense BLE | (local radio) | Direct Bluetooth Low Energy connection to Movesense sensors | — | ✓ |
A single Node process runs everything. There is no database — settings persist to JSON files under server/data/, and sessions persist as append-only NDJSON files.
Namespaces
Sessions are isolated by namespace. Every connection — viewer, sensor, OSC channel mapping — belongs to a namespace, and a token gates write access. This is what makes the same server safe to use for a private one-on-one session and a public workshop at the same time.
A namespace owns:
- A token (auto-generated, regenerable)
- A list of configured sensors with their OSC channel or BLE serial mapping
- DFA settings: window size (default 128 samples), alpha type (
alpha1by default), strictness level - An optimisation target (
fractal,regular, or other) - A pool of viewer WebSocket connections
- A session recorder for that namespace
Tokens are passed as URL parameters when connecting (ws://server:8765/?ns=X&token=T). Invalid tokens get a clean 4001 close — no silent failures.
Three Ways to Send Data In
Option A: WebSocket ingest (works on hosted and self-hosted). The iOS app and other native clients connect to the ingest WebSocket on port 8765 with namespace and token, then send JSON messages with magnitude values. Tighter coupling than OSC, no NAT issues, works over WiFi, hotspot, or the public internet. This is the only transport supported by the hosted instance at server.selfsense.me.
Option B: OSC over UDP (self-hosted only). Any device that speaks OSC — TouchOSC, a sensor's onboard firmware, a custom Unity scene — points at the server's IP on UDP port 9000. The server logs every received address and lets you map it to a named sensor in any namespace through the dashboard. One stream can route to multiple namespaces simultaneously. UDP doesn't cross the public internet cleanly, so this option requires the server to be on the same LAN as the sensors.
Option C: Movesense BLE (self-hosted only). The server can connect directly to Movesense sensors over Bluetooth, with auto-reconnect for saved devices. A sensor that powers on after the server is already running will be picked up on the next retry sweep — no manual reconnect needed. Bluetooth has a radio range of a few metres, so the server has to be physically near the sensors — which means a laptop in the room, not a hosted instance.
DFA Computation
Incoming values are routed to a per-sensor circular buffer. Whenever 4 new samples have arrived and the buffer holds at least 16, the server computes DFA on the most recent window (default 128 samples) using the dfa-variability package. The result includes:
alpha1(short-scale fractal exponent, the headline number)alpha2(longer-scale exponent)alpha(global)- Labels for each (
fractal,correlated,random, etc.) SDNNandRMSSDfor amplitude-side HRV continuity with conventional wearables- A short rolling history of recent alpha values for trend display
Every update broadcasts a dfa_update message to all viewer WebSocket clients in that namespace. Raw magnitude values broadcast as magnitude messages between DFA recomputations, so live graphs stay smooth.
Live Dashboard
The web dashboard is a React + Vite app served from the same Node process. Connect a browser to http://server-ip:3005/ and you get:
- A sensor list (left pane) with live connection status
- A live data view (right pane) — current magnitude, DFA alpha with state label, scrolling magnitude graph, rolling alpha-history bar
- Settings for OSC channel → sensor mapping, DFA window, alpha type, target state
Multiple browsers can connect to the same namespace and watch in sync. Useful for a workshop where the facilitator's screen is on a projector and each participant has their own laptop view.
Session Recording
Every connected sensor can be recorded into a session. Each session is an append-only NDJSON file with raw magnitudes, computed DFA values, and timestamps. Sessions persist across server restarts. The API exposes:
GET /api/ns/:ns/sessions— list sessionsGET /api/ns/:ns/sessions/:id/data?maxPoints=N— fetch downsampled session data for replayGET /api/ns/:ns/sessions/:id/download— stream the raw NDJSON for offline analysis
The downsampling endpoint is what powers session replay in the dashboard without loading hours of 50 Hz data into the browser.
Why a Server, Not Just an App
The phone app is enough for a solo session. The server exists for what the phone can't do alone:
- Multi-sensor sessions. A dancer with three Movesense sensors plus an iPhone HRV stream, all in one namespace, all visible on one dashboard.
- Cross-body interaction. Fractal choreography where one performer's state triggers feedback for another — the server is the routing layer.
- Group workshops. Ten participants, ten namespaces or one shared namespace, depending on whether you want isolated or collective practice.
- Performance infrastructure. A reliable OSC source for sound and visual software (Usine, ORCA, Max, TouchDesigner) that just needs DFA-classified motion in real time.
- Sessions that survive a crash. The server reconnects to saved BLE sensors on restart and keeps recording where it left off.
Try It Online (WebSocket Only)
A hosted instance is running at server.selfsense.me and is open for SelfSense users to try. It accepts WebSocket ingest only — point a sensor app at it with a namespace and token, and you can stream magnitudes in and watch the live DFA dashboard from any browser. No install, no firewall configuration, no laptop in the room.
OSC/UDP and Movesense Bluetooth are not available here — for those, see the next section.
This setup covers most solo and remote-group use cases out of the box.
Self-Hosting for OSC, UDP, and Bluetooth
If you need OSC routing (for example, to drive sound or visual software) or want the server to talk directly to Movesense sensors over Bluetooth, you have to run the server locally on the same network as your sensors. Those transports don't travel over the open internet, so the hosted instance can't help — you need a laptop or a small server in the room.
The source code is available on request to existing SelfSense users. If you'd like access — for a workshop, a performance, a research setup, or just to experiment with multi-sensor sessions on your own machine — please get in touch via the Nodus Labs support portal and describe what you're building. We'll grant repo access and help you get set up.
The self-hosted server is a small Node.js monorepo. Once you have access:
npm install
npm run dev    # server on :3005, client dev on :5173
npm run build  # build the client
npm run start  # production: single process serves built UI + APIs + WebSockets
The server prints all reachable LAN IPs on startup so iOS and other LAN clients know what URL to hit. macOS users will need to allow incoming connections for node in the firewall.
Further Reading
- The practice it serves: About the SelfSense Practice — the somatic work the server was built to support.
- The non-technical overview: The SelfSense Server — what the server makes possible, explained without the architecture.
- The choreographic application: Fractal Choreography — what multi-sensor sessions look like in performance.
- The measurement: Fractal Heart Rate Variability & DFA Alpha — what the server is actually computing.
- The single-user app: How SelfSense Works — what the phone alone can do.